RivaTuner Guide v2.02
Created: 9 August 2007
Last Edited: 21 January 2008
This is an updated version of the RivaTuner 2.0 Guide which I wrote a few months ago. This guide is very similar, but has some extra information which wasn’t mentioned in the prior version (like setting a threshold to shutdown the computer).
This guide was made using:
Windows Vista Ultimate – Even though this guide was written with Windows Vista in mind, the same steps can be used in Windows XP.
RivaTuner 2.02 – http://www.guru3d.com/rivatuner/ (The guide is compatible with RivaTuner 2.06 – Images may differ)
and the following graphics card and driver:
eVGA 8800 GTS
162.22
Reminder: Before doing anything, it’s always a good idea to read the Readme. (Start/Orb -> All Programs -> RivaTuner v2.02 -> RivaTuner documentation) Direct Path: “C:\Program Files\RivaTuner v2.02\Doc\RivaTuner.chm”
Some of RivaTuner’s Known Issues:
- Currently RivaTuner doesn’t support SLI overclocking under Vista.
- Currently RivaTuner doesn’t use driver-level clock frequency stress-testing when overclocking NVIDIA display adapters under Vista due to NVIDIA Vista driver’s stress-testing issues.
- Currently RivaTuner doesn’t provide driver-level 2D/3D fan speed control features under Vista due to NVIDIA Vista driver’s limitations.
Sections:
Configuring RivaTuner
Creating Fan Profiles
Creating Launcher Items
Configuring Automatic Fan Control
Creating Overclocking Profiles
Configuring RivaTuner
Before we begin, it’s probably a good idea to configure your RivaTuner to minimize to the System Tray, especially if you want it to automatically adjust your fan speed.
First start up RivaTuner, then go to the settings tab.

After clicking the Settings tab, check the “Send to tray on close” checkbox.

Then hit Apply.
You can also, click “Run at Windows startup” if you wish this program to startup automatically when your system boots. (Note: in Windows Vista RivaTuner will be blocked on startup; I believe this is a consequence of the UAC. This is not a problem in Windows XP)
“UAC is designed to warn user when any application with administrative rights is launched. RT uses administrative rights so you should confirm its startup manually each time when UAC is enabled.” -Unwinder
Creating Fan Profiles
Ok, let’s get started. Start by clicking the arrow box next to “Customize…” next to the second text box on the application. Then proceed to click the icon that represents a graphics card (far left side)

A window will then open up where you can control the fan speed of your graphics card. Go ahead and click the checkbox next to “Enable low-level fan control.”

You will be prompted for a “Reboot”, “Detect Now” or “Cancel”. Click “Detect Now”.

Now, we’re going to create a fan profile. Go ahead and click on the radio button called “Fixed”.

You can now drag the arrow on the bar to the desired speed. For this tutorial I will be using 60%, 80%, and 100% fan speeds. You can make as many or as few as you want.
To create a fan profile: drag the bar to the desired percentage. The picture(s) below will show the creation for 80%.
")
Click the “Apply” button. This will then set your current fan speed to 80%.

Click the (Floppy picture) save icon.
 save icon to save the fan profile")
This will prompt you with the name to enter for the fan profile. Type in what you wish. For this tutorial, I’m using “Fan 60%”, “Fan 80%”, and “Fan 100%”.
")
Once, you’ve saved that profile. You will now be able to select it from the “Fan profile settings” group box towards the bottom of the window.

Now, repeat the process for 60% and 100% fan speeds. Adjust the bar to 60%, click apply, save, then do 100%.

You can also designate a fan profile to apply during Windows startup (Note: Windows Vista will block this when UAC is enabled).
To enable this feature: Click the “Apply fan settings at Windows startup” check box.

Then hit “OK”.
This concludes Creating a Fan Profile section of the tutorial. Now, onto creating Launcher items.
Creating Launcher Items
The launcher is basically a place where profiles and items can be launched through the application itself or through the system tray icon.
From the Main window, select the “Launcher” tab.

You will now, see a listing of the launcher items created. If there is none, that’s fine, we haven’t created any.

Now, we will create a launch item that will allow the program to call a profile you’ve created. Go ahead and click the plus sign icon “Add new item”.
You will be prompted with options for the item: “Regular item” and “RivaTuner module activation item”. For now, click the “Regular item” radio button.

A window will pop up and now you will be able to input a launcher item name and what profile it is associated with.
Fill the name as “Fan Speed 60%” or whatever you’d like. Then click the “Associated fan profile” check box. You should be able to choose from the three fan profiles we created earlier. Go ahead and select “Fan 60%”.
It should look like the following:
")
Then repeat these steps two more times for “Fan Speed 80%”:

and “Fan Speed 100%”:

You should now have 3 launcher items for the fan profiles we created.

This concludes Creating Launcher Items section of the tutorial. Now, to make those fan profiles automatically switch during temperature changes.
Configuring Automatic Fan Control
Head back to the “Main” tab where we originally started. Then click on the arrow box next to “Customize…” again. Except, this time click the far right icon (magnify glass over an IC)

This will bring up a new “Hardware monitoring” window, which you can use to view various information about your graphics card: Core clock, Memory clock, Core temp, Ambient temp, Fan speed rpm, Fan duty cycle (speed). You can also use it to monitor other information, but we won’t be discussing that.
")
Click the red circle (record icon) to the bottom left of the window, this will start monitoring the information in the background.
Then, Click on the “Setup” button on the bottom right to proceed to the next step.
This will prompt you with the Hardware monitoring setup window. You can configure RivaTuner to output information to the system tray tooltip or a system tray icon.
Scroll down the list and click on “Core Temperature” and then click the “Setup” button towards the left.

You can now configure options related to “Core temperature”.
I’ve changed the “Maximum value limit” to 100.000. I’ve also clicked the check boxes “Show core temp… icon tool tip” and “Show core temp… icon”. The first check box will show the temperature read out when you hover over the Rivatuner icon in the system tray. The second icon will have an icon in your system tray showing a numeric value or bar graph representation of your GPU core temperature.
To proceed to the next step click the “Add” button (plus sign)
 button")
This is where you can use those fan profile launcher items we’ve created. Finally….
For this tutorial, we will be creating 3 thresholds. One to adjust the fan to 100% if the temperature exceeds 65 C. Second to adjust the fan 80% if the temperature exceeds 55 C. Third to shutdown the system if the temperature exceeds 81 C. These can be adjusted however you desire.
First input the name of the threshold. I used “Fan Speed 100%> 65 C”
Change the value to “65?
Select it to launch and item on upward threshold crossing and choose “Fan Speed 100%”.
Then select it to launch and item on downward threshold crossing and choose “Fan Speed 80%”.

Click “OK”. Then click the “Add new threshold” button again.
Follow the previous steps, but use the following data this time: (you can change the color to orange if you want, this will show up on the hardware monitoring graph)

Next, we will create a special threshold item to shutdown the system in case a temperature is reached that it close to damaging for the hardware component. I’m not certain the exact temperature these graphics cards can handle, you will want to find this information out. I believe for the G80s, the limit is 120 C. I’ve used 81 C, since I’ve never passed 75 C with the automatic fan speeds.
This time change it to Launch application on upward threshold crossing. Either browse or type in the path to the “shutdown.exe”.
(or copy/paste) %SysDir%\shutdown.exe
“It would be more correct to use %SysDir% macro instead of explicit path to OS. I.e. %SysDir%\shutdown.exe” – Unwinder
Then input these variables into the command line box (hyphens (-) or slashes (/) will work):
-s -t 0 -f
You could also add a -c and a comment to inform the user of the reason for shutting down.
Example: -c “GPU Temperature has exceeded maximum threshold. The computer will now shutdown.”
You can test this feature in the command prompt and to abort, use: shutdown.exe -a
Those variables have to do with time and forcing the computer to close applications and shutting down. For more information you can launch a command prompt (XP: Start -> Run -> “cmd”) (Vista: Orb -> “cmd” in Search Box). Then type “shutdown.exe /?”. This will give you a list of available options.
Partial help from the shutdown.exe /?
/s Shutdown the computer.
/t xxx Set the time-out period before shutdown to xxx seconds. The valid range is 0-600, with a default of 30. Using /t xxx implies the /f option.
/f Force running applications to close without forewarning users. /f is automatically set when used in conjunction with /t xxx.

Congratulations, you’ve just configured RivaTuner to automatically adjust your graphics card fan.
Should now look like the following:

Click “OK”, then “OK” again, then close the Hardware Monitoring window. (make sure the red record icon is enabled)
This concludes Configuring Automatic Fan Control section of the tutorial.
Creating Overclocking Profiles
Time to overclock. This guide isn’t the ultimate overclockers guide, just how to do it using RivaTuner. It’s recommended that you research your graphics card’s capability and know it’s limits. Then take baby steps to find the limit. ATI Tools is a good way to determine the maximum you can reach before getting artifacts.
To start, head to the “Main” tab in Rivatuner. Click the arrow next to second “Customize…” down, and then click the far left (graphic card) icon.

Click the “Enable driver-level hardware overclocking” checkbox at the top of the window.

You will then be prompted to “Reboot”, “Detect now”, or “Cancel”. Go ahead and select “Detect Now”.

RivaTuner should now detect your current core and memory clock and allow you to change their speeds.
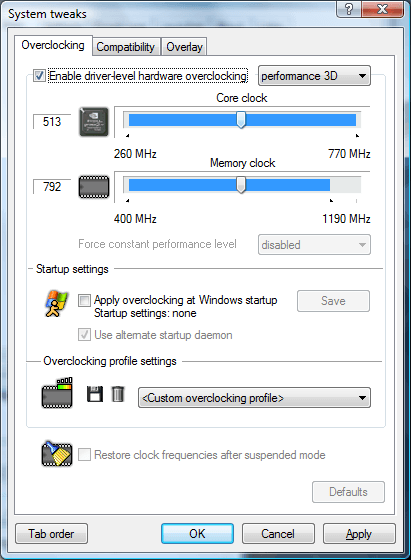
Next drag the arrows next to “Core clock” and “Memory clock”. It’s usually best to try small increments first to see if the graphics card can handle it. Also, you may want to check a game or benchmark application for any artifacts or glitches in the video.
In this tutorial, I am using a eVGA 8800 GTS and Rivatuner reports my clocks as 513/792, which is advertised as 500/1600. I am going to change the clocks to 620/1000 as that represents the speed of eVGAs 8800 GTX Superclocked. You can also look up what other people have obtained as a reference for possible configurations.
Make sure to take small steps in overclocking! You don’t want to damage your hardware.
EVGA is one of the brands which supports overclocking and has an excellent RMA service and customer support. Think Costco or NewEgg.com.

I’ve adjusted my clocks to 576/850. I’ve chosen this because G80 (my graphics card) core operates in intervals of 13 and whether or not you set it to 575 or 584 it will choose the closest 13th interval. You can research your card to find out what yours does or just open up Hardware monitoring and see.
Under Windows XP, there is a “Test” button, which needs to be clicked. This is not the case in Windows Vista.
Go ahead and click “Apply”.

You should now save your overclocked settings to a profiled.
Click the save (Floppy) icon.

You will be prompted to enter a name for this overclocking profile.
I usually use the Core/Memory clock. So, 575/850.
")
You can now access those settings from that overclocking profile. Your window should now look like the following:

Click “OK”.
This concludes Creating Overclocking Profiles section of the tutorial.
Thank you very much for using my Tutorial. Please reference me if you decide to link to or copy my tutorial.
.
.
.
Copyright (c) 2007 Derek Wood
Permission is granted to copy, distribute and/or modify this document under the terms of the GNU Free Documentation License, Version 1.2 or any later version published by the Free Software Foundation; with no Invariant Sections, no Front-Cover Texts, and no Back-Cover Texts.