RivaTuner Guide v2.0
A lot of people tend to ask on how to set fan speeds or overclock their graphic cards. This guide will hopefully help you understand how to use the features that Rivatuner provides.
This tutorial/guide will be using the following graphics card and driver (NVIDIA):
Sections:
- Creating Fan Profiles
- Creating Launcher Items
- Configuring Automatic Fan Control
- Creating Overclocking Profiles
Rivatuner main content:
Creating Fan Profiles
Let?s start by configuring fan speeds and controlling them using RivaTuner.
If you are using a NVidia driver higher than 100.XX you will probably need to configure a Power User setting. (Although recent driver releases: 158.XX and higher have been detected by Rivatuner as 58.XX and work)
Go ahead and start by opening up RivaTuner. Click on the arrow box next to Customize? next to the second text box on the application. Then proceed to click the icon that represents a graphics card.
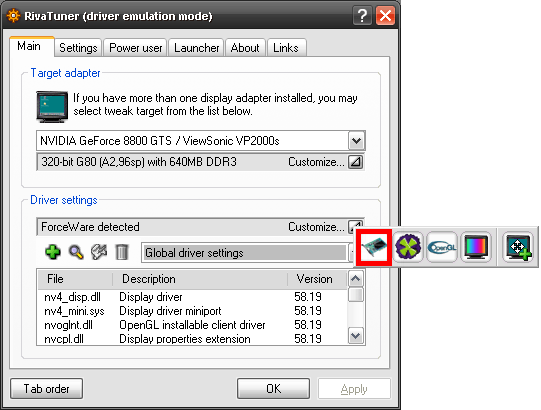
A window will then open up where you can control the fan speed of your graphics card. Go ahead and click the checkbox next to ?Enable low-level fan control.? If you are prompted for a ?Reboot? or ?Detect Now?, click ?Detect Now?.
Now, we?re going to create a fan profile. Go ahead and click on the radio button called ?Fixed?. You can now drag the arrow on the bar to the desired speed. For this tutorial I will be using 60%, 80%, and 100% fan speeds. You can make as many or as few as you want.
Go ahead and drag the bar to 60% and click Apply (60% may already be set as it may be the default speed). This will then set your current fan speed to 60%.
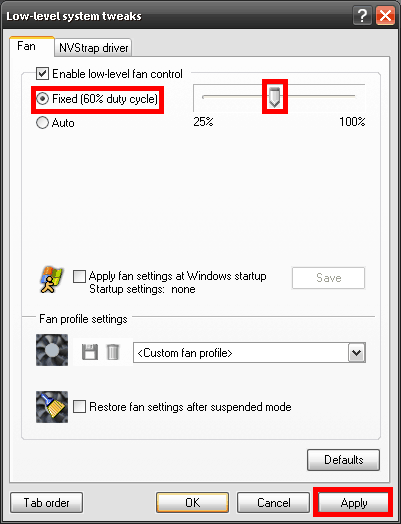
Next, we are going to save that fan speed to a profile, so it can be accessed later. After you clicked the ?Apply? button, the diskette looking icon should now be enabled.
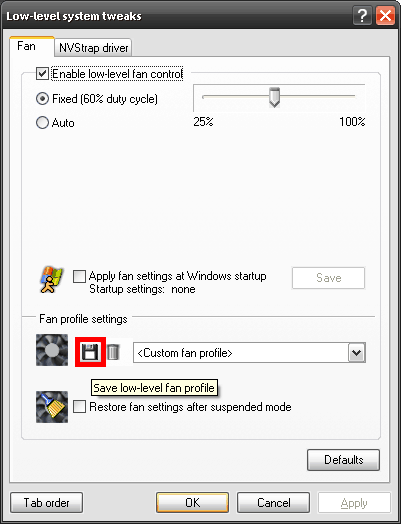
Go ahead and click the Save Icon (diskette picture). This will prompt you with the name to enter for the fan profile. Type in what you wish. For this tutorial, I?m using ?Fan 60%?, ?Fan 80%?, and ?Fan 100%?.
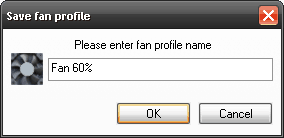
After you have saved the profile. Go ahead and repeat this two more times for 80% fan speed and 100% fan speed.
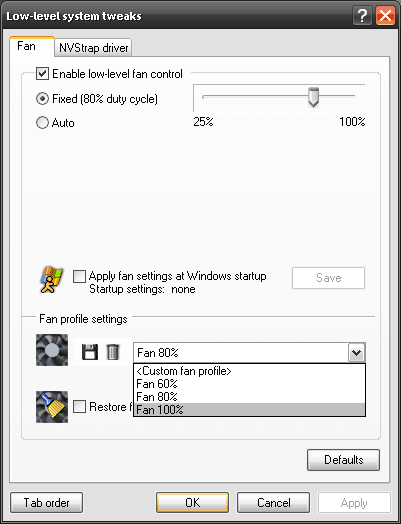
You should now have 3 fan profiles: ?Fan 60%?, ?Fan 80%?, and ?Fan 100%?
Now, we will proceed to the next step.
Creating Launcher Items
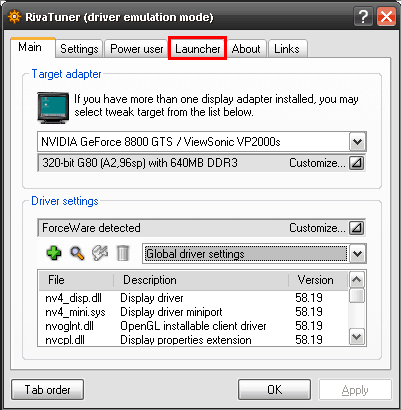
Close the current window, so that you are back where you started originally. Then select the Launcher tab at the top of the window.
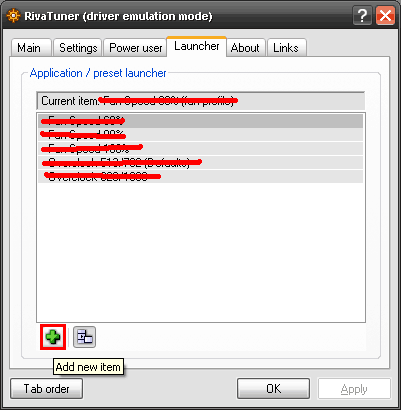
Now, we will create a launch item that will allow the program to call a profile you?ve created. Go ahead and click the plus sign icon ?Add new item? (Ignore all the crossed out text, these are items we have not yet created).
Then click the ?Regular Item? radio button.
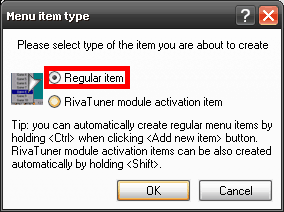
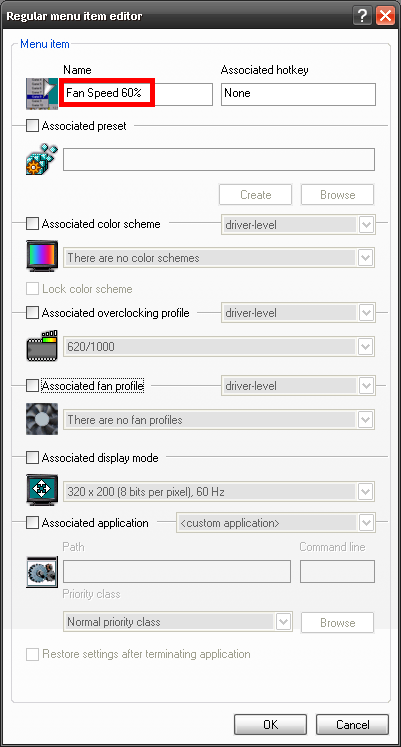
Now, you will be able to create a launcher item name and what profile it is associated with. Fill in the Name textbox with a new profile name: ?Fan Speed 60%?
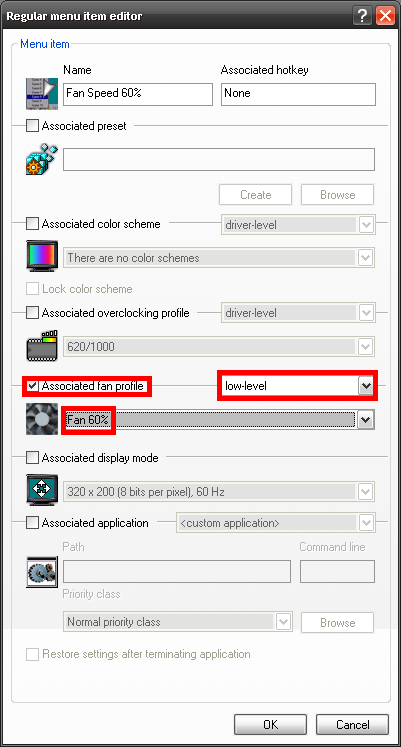
Then click the checkbox next to ?Associated fan profile?, click the dropdown box and select ?low-level?. This will give you the available profiles which we created earlier. Select ?Fan 60%?
Go ahead and repeat the past few steps for ?Fan Speed 80%? and ?Fan Speed 100%? launcher items, so that the next picture looks similar to this. (Again, ignore the crossed out text)
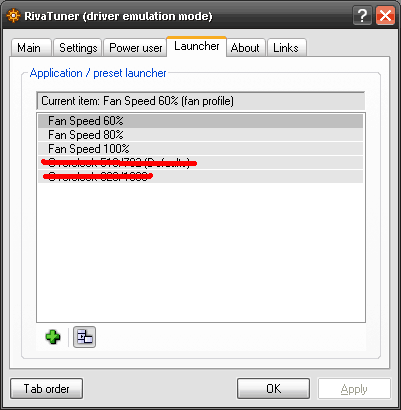
You will have now created 3 launcher profiles which call the 3 previous fan profiles we created. Next we are going to tell Rivatuner to adjust the fan speed based on the temperature of the graphics card.
Configuring Automatic Fan Control
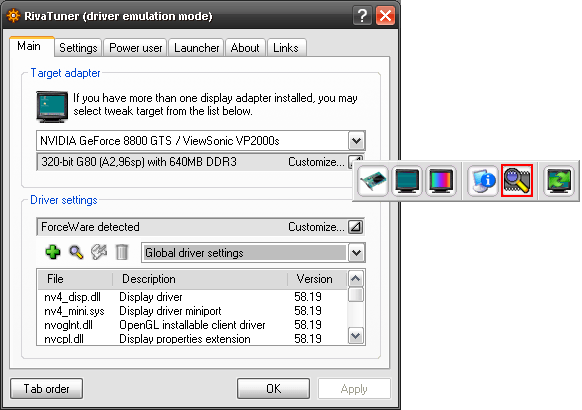
Go back to the Main tab where we originally started. Click on the arrow box next to Customize next to the second text box on the application. Then select the icon that looks like a magnifine glass over an IC.
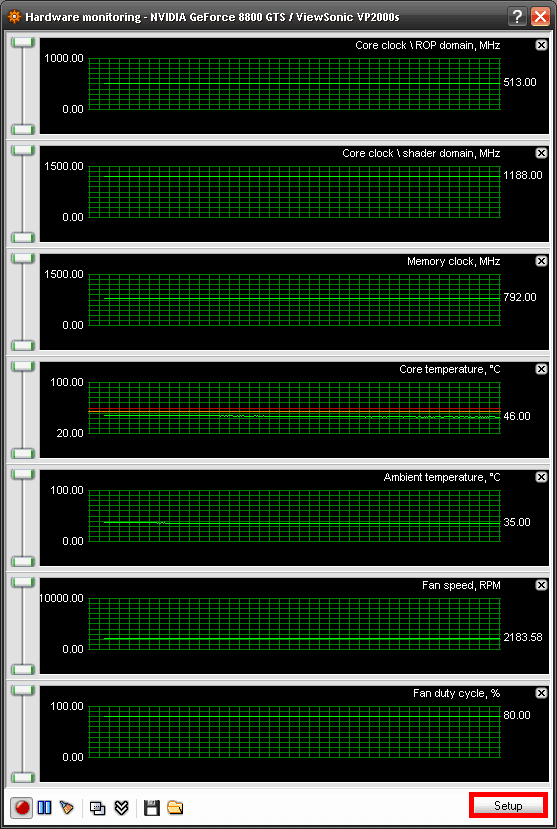
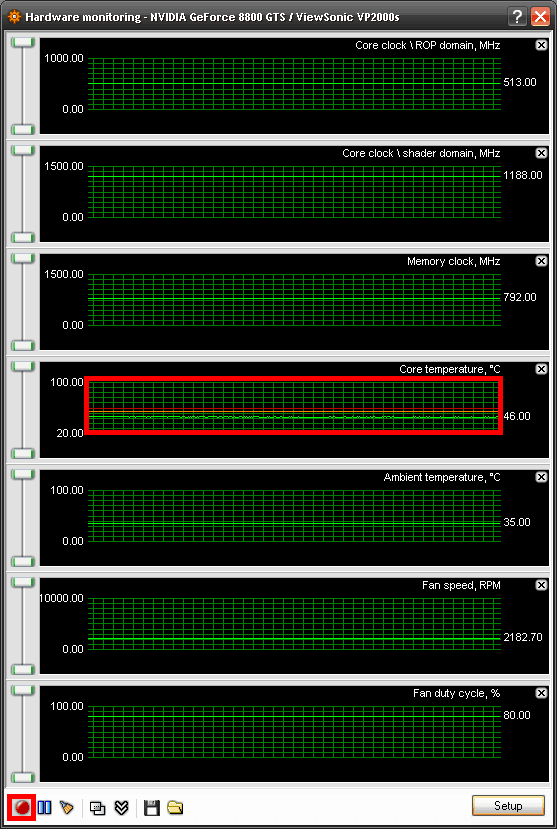
This will bring up a new Hardware monitoring window that you can view various information about your graphics card: core clock mhz, memory clock mhz, core temp, ambient temp, fan speed rpm, fan duty cycle (speed).
Click on the Setup button on the bottom right to proceed to the next step.
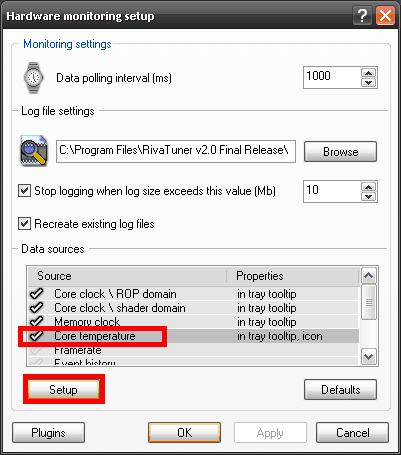
After you’ve clicked the Setup button you can now configure options for the hardware monitoring function of Rivatuner Scroll down the list and click on Core Temperature and then click the Setup button towards the left.
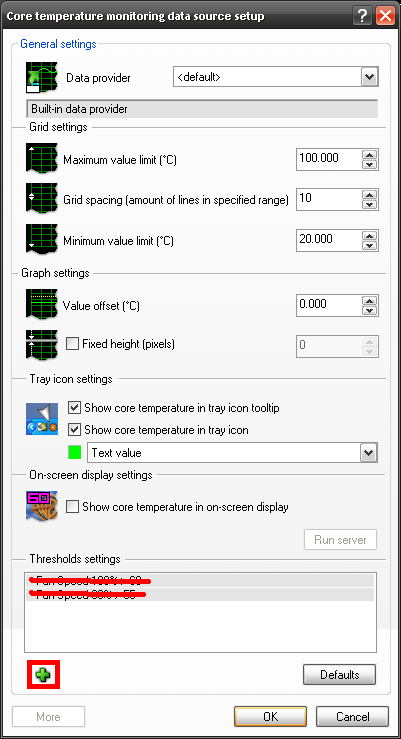
You can now configure options related to Core temperature. I’ve changed the gMaximum value limit to 100.000 and the Minimum value limit to 20.000. I’ve also clicked the check boxes Show core temp icon tooltip and Show core temp iconh. The first checkbox will show the temperature read out when you hover over the Rivatuner icon in the system tray. The second icon will have an icon in your system tray showing a numeric value or bar graph representation of your GPU core temperature.
To proceed to the next step click the Add button (plus sign) (Again, ignore any crossed out text).
Begin, by typing in the name of Core temperature threshold. For this tutorial I will be using Fan Speed 100% > 60. Then change the value C to 60.
I’ve also changed the color to red here. (should be red by default)
Next, click the drop down box next to Launch and click item. (Launch item on upward threshold crossing)
Then select the launcher item Fan Speed 100%.
Click the next drop down box and select item. (Launch item on downward threshold crossing)
Then select the launcher item gFan Speed 80%
Basically, this will tell Rivatuner that if the temperature of the graphics card exceeds 60 degrees celsius (61) then launch the item Fan Speed 100%, which calls the fan profile we made Fan 100%. If the temperature falls below 60 degrees celsius (59) then it will launch the Fan Speed 80% item.
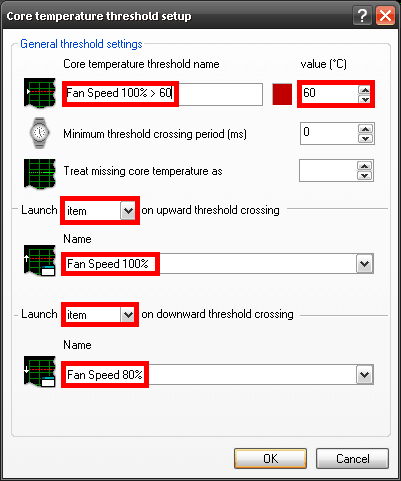
Click Ok, and then click the Add button again (plus sign) .
We are now going to configure for another temperature change.
Fill in the name Fan Speed 80% > 55. Then change the value C to 55.
I’ve set the color to orange here.
Next, click the drop down box next to Launch and click item.
Then select the launcher item Fan Speed 80%.
Click the next drop down box and select item.
Then select the launcher item Fan Speed 60%
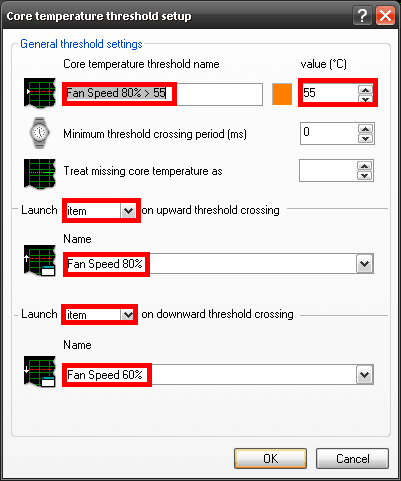
Click Ok, and your window should now look like the following:
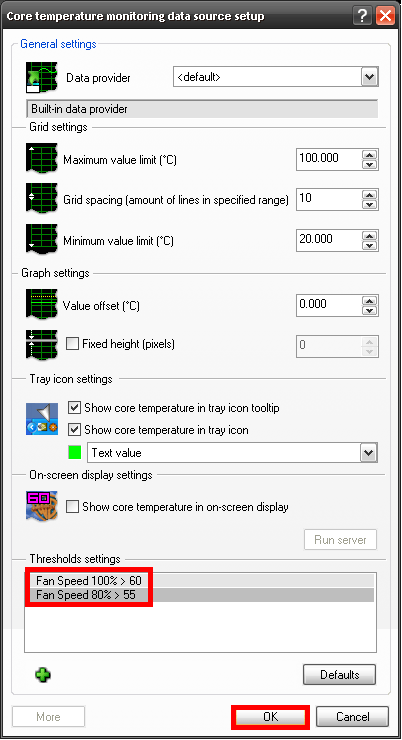
Click Ok.
Congratulations!!
You will have now configured RivaTuner to change the Fan Speed of your graphics card based on the temperature. If it’s greater than 60C then Fan Speed 100%. If it’s greater than 55C then change to Fan Speed 80%. You can configure this in anyway you choose; higher temperature or multiple entries with multiple fan profiles.
If you look at the Hardware monitoring window now, you should see 2 lines on your Core temperature section that are basically just markers. I also recommend that you click the Record button on the far left (red circle). To keep the monitoring continueing in the background even if this window is closed.
Another nice feature, now that you have your launcher items created, is the ability to call the items through the system tray icon.
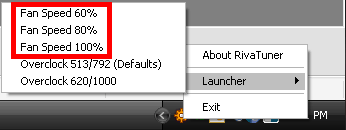
You can also call Overclocking profiles, which we will discuss next.
Creating Overclocking Profiles
You should now be more familiar with the basics of RivaTuner. Proceed to the Main window tab and select the graphics card looking icon from the second arrow box down.

Then click the checkbox next to Enable drive-level hardware overclocking.
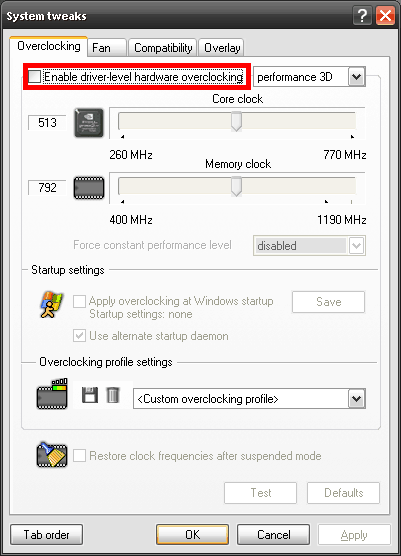
You will then be prompted to Reboot or Detect now. Go ahead and select Detect Now.
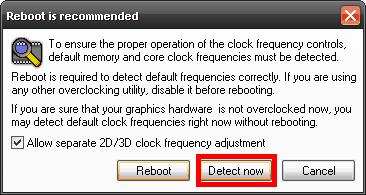
The program should detect your current core and memory clock and allow you to change their speeds.
Select the drop down box in the top right and select performance 3D.
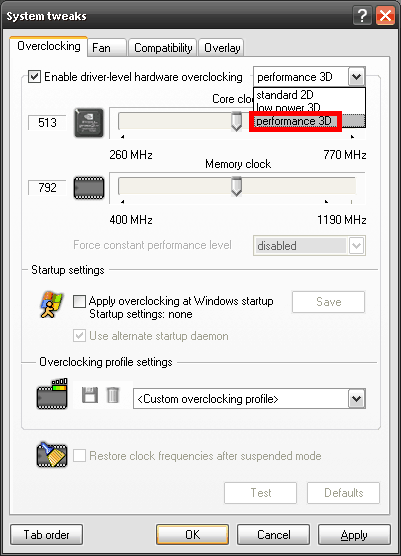
Next drag the arrows next to Core clock and Memory clock. It’s usually best to try small increments first to see if the graphics card can handle it. Also, you may want to check a game or benchmark application for any artifacts or glitches in the video.
In this tutorial, I am using a eVGA 8800 GTS and Rivatuner reports my speeds as 513/792. I am going to change the speeds to 620/1000 as that represents the speed of eVGAs 8800 GTX Superclocked. You can also look up what other people have obtained as a reference for possible configurations.
So, change the speed to the desired position. This tutorial will use 620/1000??. Then click the Test button towards the bottom of the window.
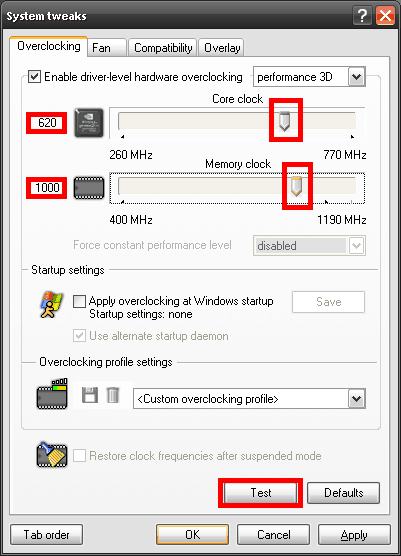
Hopefully the test was successful. If not, try lowering it.
Next click the Apply button, so that we can save this to a profile.
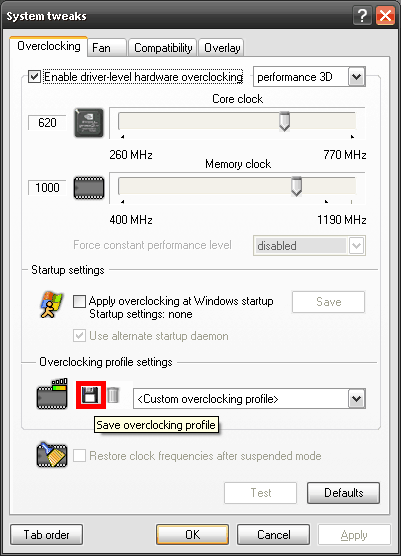
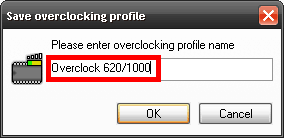
Go ahead and name the profile. I usually choose the Core Clock/Memory Clock.
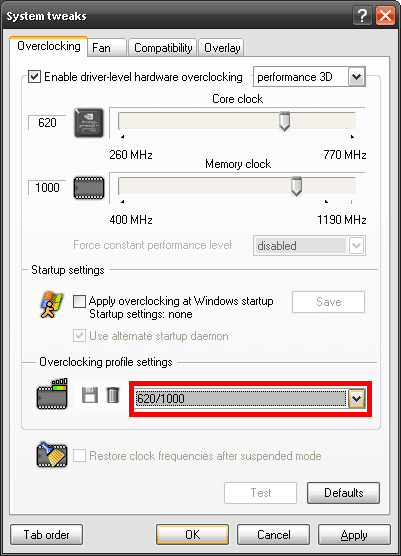
You should now have that option available to you in the drop down box. So, you can return to it later.
Finally, if you desire you can create a launch item to call that profile, so it can be accessed through various RivaTuner controls: select it from the system tray Launch menu, switch to it if a temperature is low enough, etc.
PowerUser
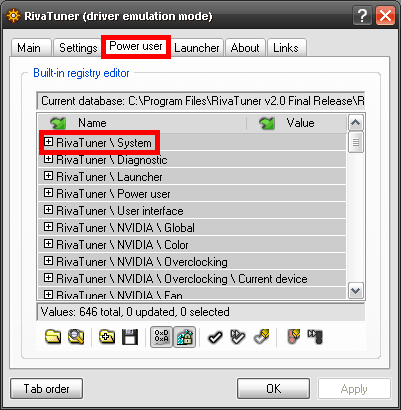
Sometimes in order for Overclocking or Fan Control to work you need to force driver versions. To do this go to the ?Power User? tab in RivaTuner.
Expand the ?RivaTuner \ System? option.
After you have expanded the option, scroll down until you find ?ForceDriverVersion?. Double click on the collumn next to it and type in the driver version. Example: nvidia driver 158.19 would be 15819
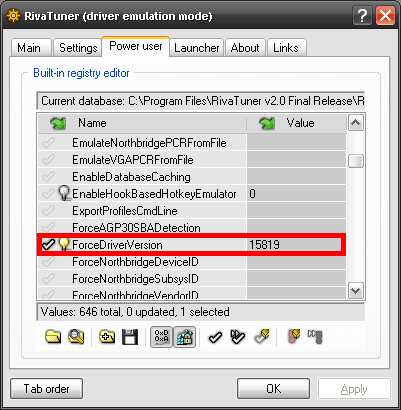
Then click the check icon, click Ok or Apply and restart RivaTuner.
Thank you very much for using this Tutorial. This article was written by Derek Wood

